


Print Information for
Paper & Ice Cream Cups
ℹ️ Deze pagina is momenteel alleen beschikbaar in het Engels, maar we werken eraan om deze binnenkort in het Nederlands te vertalen


For printing, all colours are converted to CMYK values. We try to match Pantone colours as closely as possible, but deviations can occur. Therefore, it is best to work with CMYK from the outset.
To ensure that your graphics (images, text, etc.) do not become blurry or pixelated, we recommend working with a resolution of at least 300 dpi.
Our printing machines require the print file exactly as we have provided it to avoid shifts or other printing errors.
- Do not alter the artboard (dimensions, format, etc.)
- Do not export the PDF, simply click “Save” (Windows: “CTRL+S”, Apple: “CMD+S”)
- Do not add any bleed or similar elements
- Do not change anything in the elements that are part of the “Technical Layer”
Printing machines use various layers of ink that mix together to create the final colours you see on your cup. These layers consist of Cyan, Magenta, Yellow, and Black (commonly referred to as “CMYK”, originating from the English terms). If too much ink is applied, the print becomes too wet and may smear, resulting in a poor-quality print.
Therefore, it is crucial that the total ink coverage does not exceed 280%. It is recommended to check the ink coverage of your final print file with Adobe Acrobat Pro (“All Tools” → “Print Production” → “Output Preview”) or another tool of your choice.
To avoid any font issues, please convert all text to outlines before the final export (In Adobe Illustrator, for example, you can do this by selecting all text and using the shortcut “CTRL+SHIFT+O” (Apple: “CMD+SHIFT+O”)).
► Note: Once text is converted to outlines, it can no longer be edited, so only do this when you have finished your design.
Our printing machines use the standard format PDF, which is well-established in the printing industry. This ensures consistent appearance, regardless of the software or operating system used.
► Please do not add crop marks or other print-specific marks, as our print template already includes them.
In our print template, you will find various layers named according to their purpose. Please place your graphics, text, and images only on the layer labelled “Artwork Layer” – only the content on this layer will be printed!
The ISO 12647-2 colour standard should be available and selected by default in all current design software. If you have set a different colour profile, please change it for the export of your final file to ensure correct colour representation in print.
Slight shifts can occur during printing, as the large printing machines process material at high speeds. To ensure that no unwanted edges appear in the visible area, it is highly recommended that all backgrounds (images, colours, etc.) extend beyond the marked bleed area.
Your customers should be able to read and see what you want to convey. Therefore, it is important that nothing is cut off or lost in print. Place all important elements, such as your text, logos, or key graphics, within the visible area.
► We generally recommend maintaining a small margin of about 4 mm from the edge of the visible area to account for typical shifts in the printing machines.

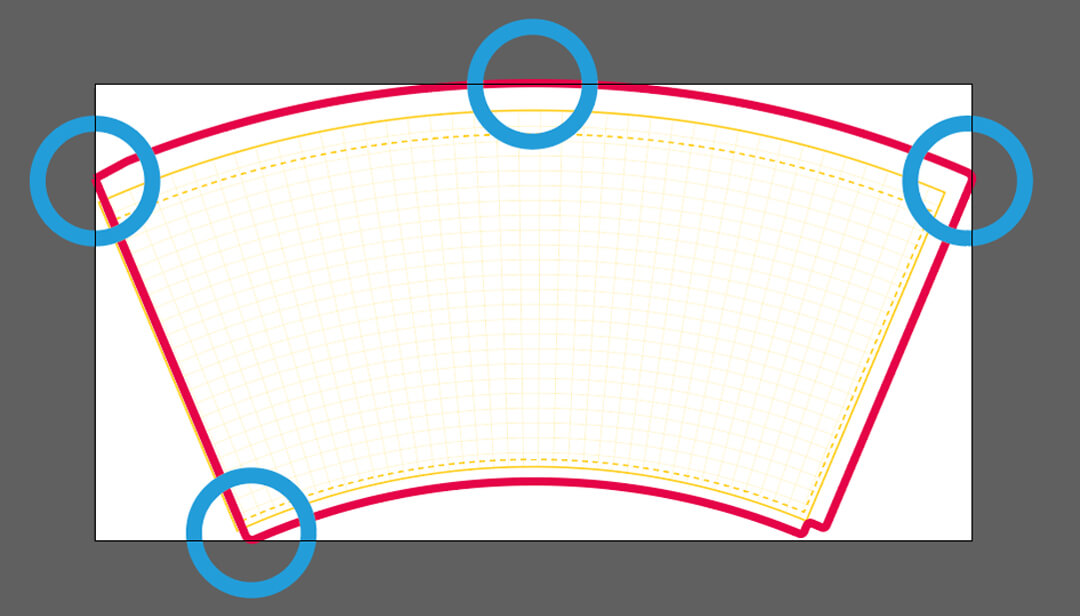
Since cups are wider at the top than at the bottom, the walls are not vertical. Therefore, printing on cups is not the same as printing on a rectangular sheet of paper. If you do not adjust for this, design elements may appear skewed or distorted.
To help with this, we have included a grid in the print template that visualises the curvature and assists in adjusting your elements accordingly. Text should follow the grid lines; you can use the “Warp” effect in Adobe Illustrator, for example.
The recycled cardboard we use for the second wall of the paper cups is not bright white, but rather a light grey. Therefore, the paper cups will not be bright white if the cup design has a white background, and they may not match the exact colour if you reorder.
The layer labelled “Technical Layer” in our print template contains our print marks to help you with your design. Once you have finished designing, please remember to hide or delete this layer so that your final print file only contains the “Artwork Layer” with your design elements.
Our print templates are designed to help you create your design so that your cup looks exactly as you envision it.
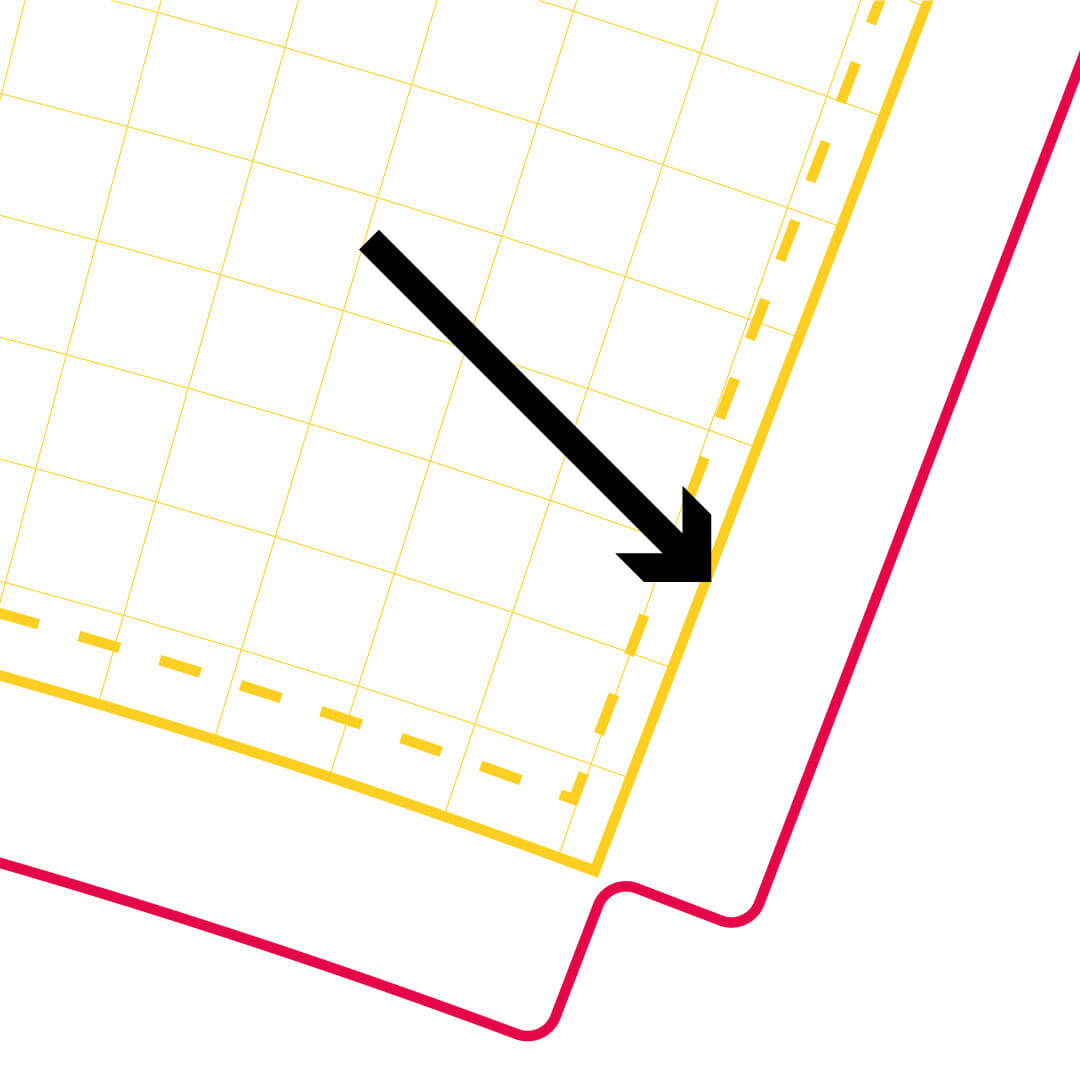
- The red line is the cutting line: This is where the printing machines cut.
- The thicker yellow line is the bleed area: Place only backgrounds and other elements that can be cut off here.
- The dashed yellow line marks the end of the visible area: Everything within this area will be visible on the final cup.
We are happy to print paper cups in various designs and sizes for you.
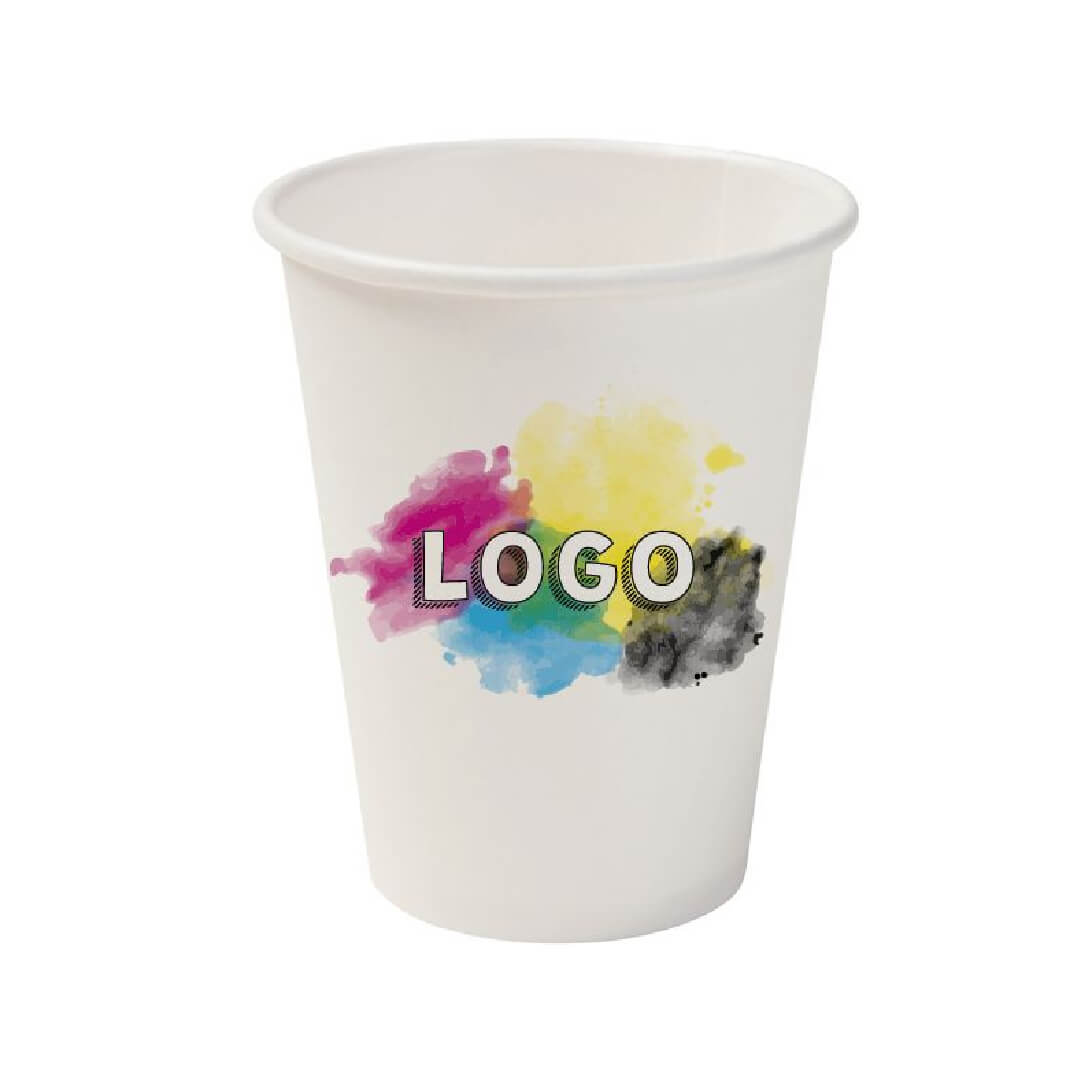
Your logo on a coffee cup as an advertising space or a QR code for a promotion in a restaurant – the possibilities are only limited by your creativity!
Are you active on social media? Feel free to tag us in pictures of your finished cups: @GreenBox_packaging.
We look forward to seeing your posts! 😊

Or for summer: Ice cream cups with your design!
We also offer various industry-standard sizes here. Simply choose the right cup, download the print template, and start designing!
Whether it’s just your logo, colourful designs for children, or informative text... The sky’s the limit, as they say in English.
Frequently Asked Questions & Issues
Eine häufige Fehlerquelle ist das Verändern der Druckvorlage oder des Datenformats. Bitte beachte unbedingt beim Öffnen der Druckvorlage, dass die Maße nicht verändert werden. Am besten öffnest du die Datei in einem Illustrationsprogramm wie z. B. Adobe Illustrator.
Achte beim Speichern drauf, dass kein weiterer Beschnitt angelegt wird. Dieser würde die Größe der Zeichenfläche wieder verändern, sodass der Becher nicht in den Druck gehen kann.
Du kannst eine korrekt angelegte Druckstanze daran erkennen, dass das Template immer an mindestens einem Punkt der vier Seiten bis zum Rand geht. Allerdings sollte die „Technical Layer“-Ebene hinterher aus dem Dokument entfernt oder ausgeblendet werden.
For our paper and ice cream cups, the maximum ink coverage is 280%. You can check the ink coverage of your PDF print file in Adobe Acrobat Pro under: “All Tools” → “Print Production” → “Output Preview”. Simply set the percentage to 280 at “Total Ink Coverage”, and all areas in the document that exceed this value will be highlighted in bright green (if you use a lot of green in your graphic and it is not clear, you can also change the colour next to “Total Ink Coverage” that highlights areas with excessive ink coverage).
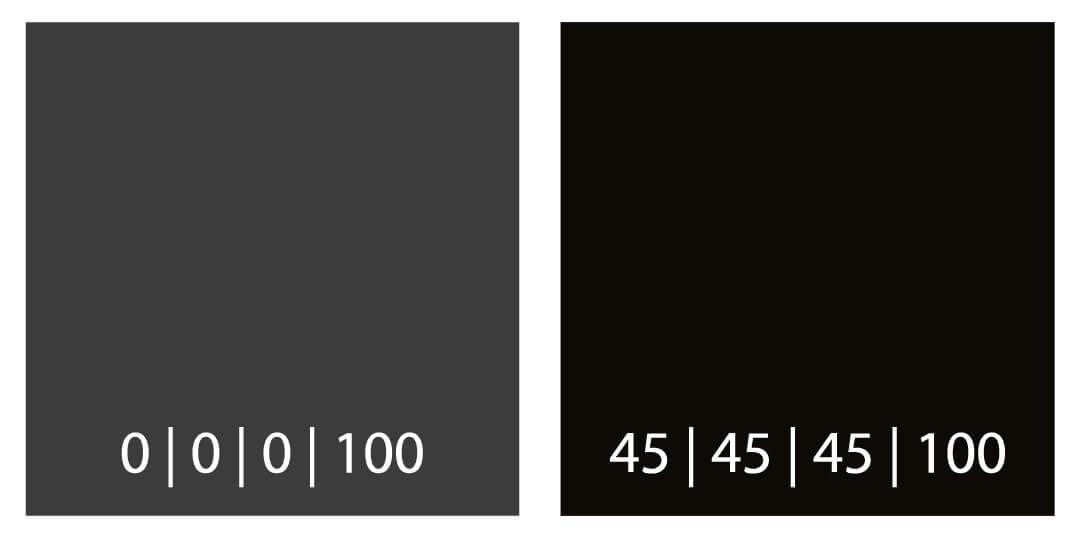
This often happens when graphics and images are converted from the RGB to the CMYK colour space, particularly black areas that often exceed the recommended value.
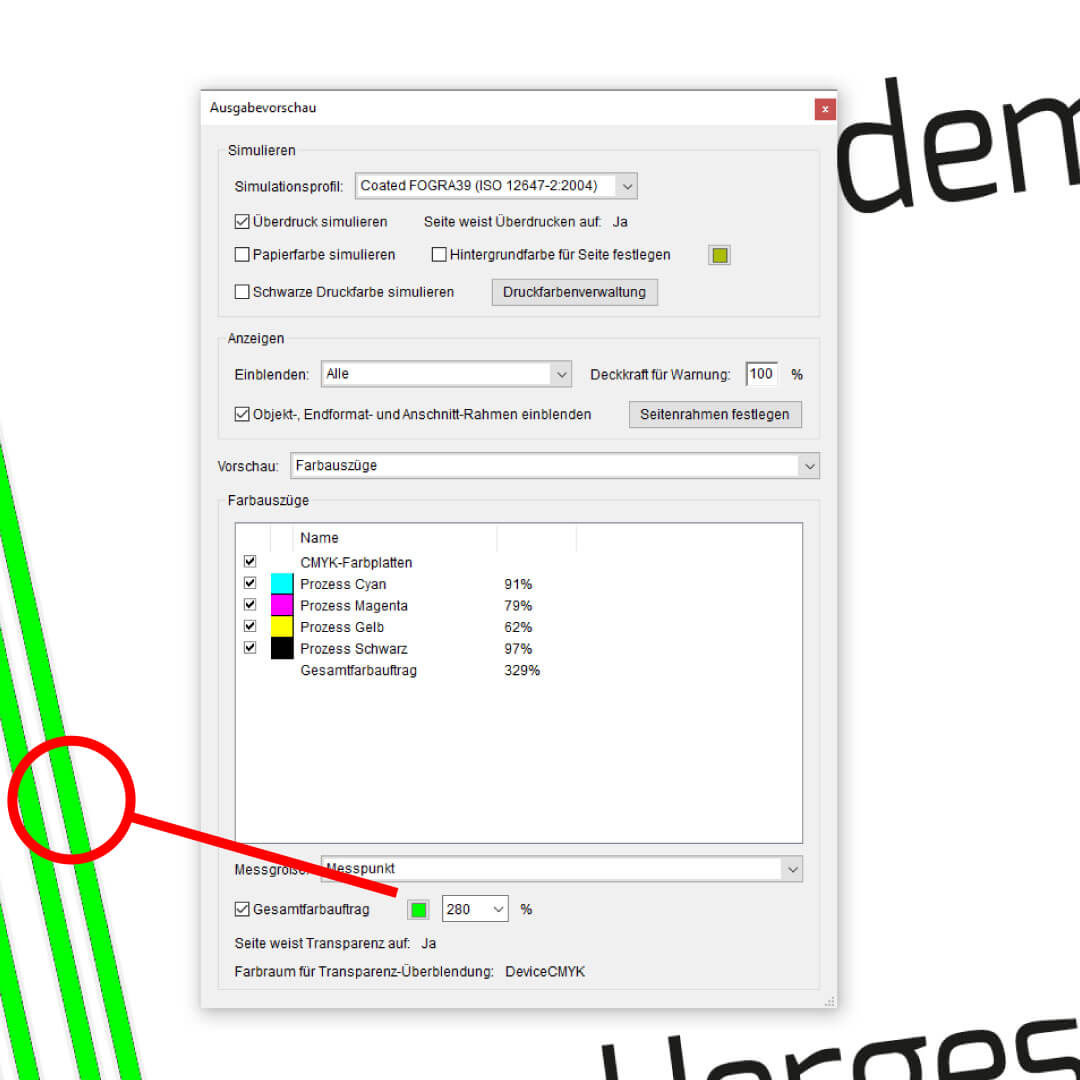
Since ink coverage must not exceed 280%, please set up your “Rich Black” with the values C45 M45 Y45 K100.
We recommend using our curved print templates whenever possible for your design. These help you understand and correct the distortions that occur when designing a cup.
If this is not possible for you at the moment, we can alternatively offer uncurved print templates that are automatically adjusted to the curvature of the respective cup.
However, it is important to understand that this automatic conversion does not correct any distortions. Please continue to ensure that anything printed at the top edge of your cup is stretched, while everything at the bottom edge is compressed. For many visual elements, these differences are not critical, but text and logos should always be adjusted or, for safety, placed as centrally as possible on the cup.
If you, despite these disadvantages, prefer to use a rectangular template, make sure when downloading that you choose the exact right template for your cup.
Paper Cups:
Paper Cup 100 ml / 4 ozPaper Cup 200 ml / 8 ozPaper Cup 300 ml / 12 ozPaper Cup 400 ml / 16 oz
Paper Cups (double-walled):
Paper Cup (double-walled) 200 ml / 8 ozPaper Cup (double-walled) 300 ml / 12 ozPaper Cup (double-walled) 400 ml / 16 ozIce Cream Cups:
Ice Cream Cup 75 ml / 3 ozIce Cream Cup 125 ml / 5 ozIce Cream Cup 150 ml / 6 oz
We would love to, but unfortunately, our resources are limited. For this reason, we offer several cups in a practical “Easy-Print” design. These cups are pre-designed by us but can be customised by you with your desired word or text. For example, you could write your company name on the coffee cups for your customers.


